Hi, The history of the Swift programming language is not very historical. However, it is…

Preparing Project Template for Xcode
Our purpose in this article is to prepare our own project template on Xcode as like Single View App. Nowadays, encoding the projects and transforming them to a product are very important. Furthermore, another important point is the software architectural pattern to be preferred at the beginning of the project. This part is usually left to the initiative of coder. Hence, there emerges such projects hard to repair or update.
Every product in software projects can be developed by choosing a different architectural pattern (MVP, MVVM, MVC, VIPER etc.). The chosen architectural pattern is a case about the project’s scope and necessities. However, creating a new project, naming rules, file structures etc. always differ at the start of project, no matter how much attention is paid. Accordingly, when there comes a new request about project, it becomes a little complicated what to find and where to find. That’s why, you can generate startup templates ideal for architectures on Xcode in order to minimize the time spent during the period of creating project. So, all your projects proceed on a specific structure and you can save your time.
I have belabored, let’s talk about how to create a project template for Xcode.
1. Creating Xcode Project Template
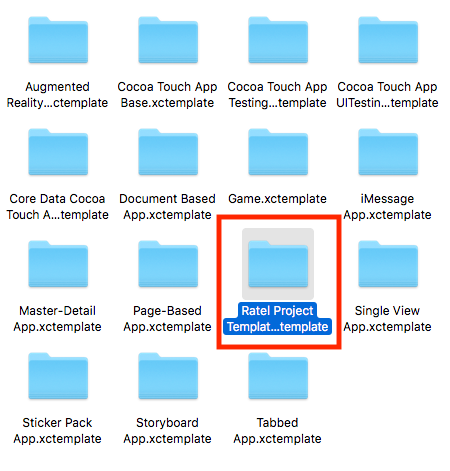
First of all, the term of “template” refers to the structures appeared after choosing the option “Create a New Xcode Project” as like Single View App, Game, Tabbed App etc. The default project templates within Xcode are placed under the index “/Applications /Xcode.app /Contents /Developer /Platforms /iPhoneOS.platform /developer /Library /Xcode /Templates /Project/ Templates /iOS/Application”. Single View App.xctemplate located under this index is our main project template for using in Swift projects. I will go on by copying and updating the file Single View App.xctemplate in this index. If you want, you can go on by creating a new file; but you have to be sure that your new file ends with “.xctemplate”.
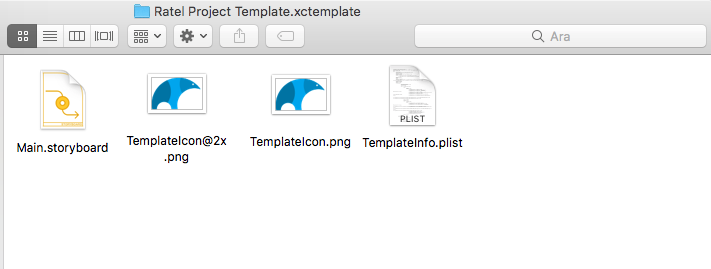
Looking inside Single View App.xctemplate, you will see the files below. TemplateIcon and TemplateInfo are the files compulsory for the template.
• Main.storyboard
• TemplateIcon.png
• TemplateIcon@2x.png
• TemplateInfo.plist
Main.storyboard is the display screen of application, and TemplateIcon is the picture of your template. Here, the major thing is TemplateInfo.plist file. We will do everything within that. The area Identifier within TemplateInfo.plist should be a unique area. After changing it and restarting the Xcode, the template that we have created will appeared on the screen. Our file structure will be as below.


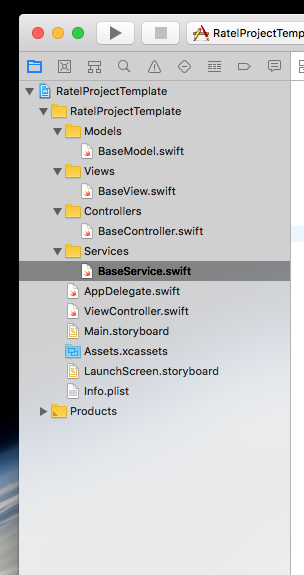
As you see in the pictures, the project template that we have created “Ratel Project Template” has successfully come to the inside of Xcode.
2. Including Architecture to Project Template
In this section, we will include the simple Xcode files that you have created as suitable for your architecture to the system. I have created a simple structure appropriate for MVC architecture. If wishing, you can create different architectures for you.
As you see below, I have created a simple empty Xcode project. Now, I am going to our project file, copying the files Models, Views, Controllers and Services and pasting them to the file .xctemplate. We will make final adjustments within TemplateInfo.plist.
3. Editing the File TemplateInfo.plist
Let’s open the file TemplateInfo.plist. Following Options > Item 0 > Units > Swift > Nodes, we create new Item (String) for each file, and add all the files that we have copied with their paths as the Item value.
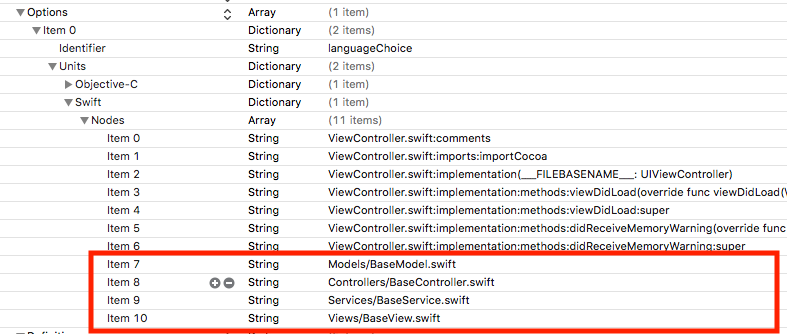
If we just add and drop in this way, Xcode will make empty files. We also have to define them under Definitions in order to copy existing files to the template.
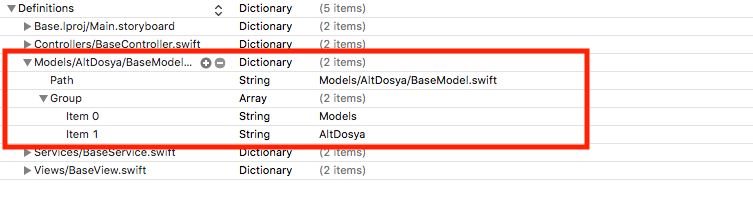
We are adding the file paths under Definitions in TemplateInfo.plist (they will be added separately for each file). If the name of values we added are file path, it should be Dictionary. Then, we are adding 2 areas as Path (String) and Group (Array) under each file path we added. Here, Path is again file path, and Group components are the files we skip when going to file path (file breakdowns). It can be understood more easily on the picture below.
That’s all. Now, the related architectural files will be automatically added to all the projects created by selecting the new template we have made. Besides, I suggest you to read the 4th clause for the process of adding module optionally.
4. Adding Optional Module
In this part, I will show you how to add checkbox just like Use Core Data during creating project on Xcode, and how to include the related project modules (e.g. Login Module, Tutorial Module etc.) to the project according to this checkbox value.
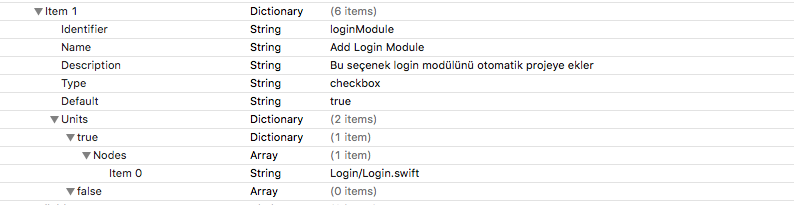
For this, we add a new Item under the Options within TemplateInfo.plist. We attach new components as like Identifier (String), Name (String), Description (String), Type (String), Default (String), Units (Directory) to this Item. Whereas, we insert 2 components under Units for the conditions whether the checkbox is clicked or not (true, false). This section may vary depending on what to do as a result of the answers. I will add Login Module to the system, if the checkbox is clicked (true). In order to do this, I assign the type of true value as Directory. Because I will not do anything for the option false, you can value whatever you want in this area. We add a new value named Nodes (Array) under the true (Directory). Finally, we attach the instructions under this Nodes as Item. Since wanting to add the range Login/Login.swift, I assign the Item 0 (String) value as Login/Login.swift. Here you can have what you prefer done. You can see breakdowns on the picture below.
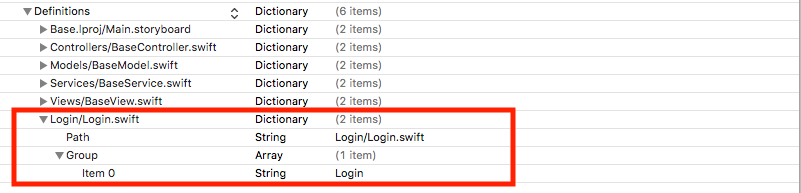
NOTE: If you carry out the actions that I have mentioned above paragraph, an empty file named Login.swift will be added to your project. However, because wishing to add our file Login.swift to the project, we should also attach the Login files under Definitions stated in the 3rd clause.
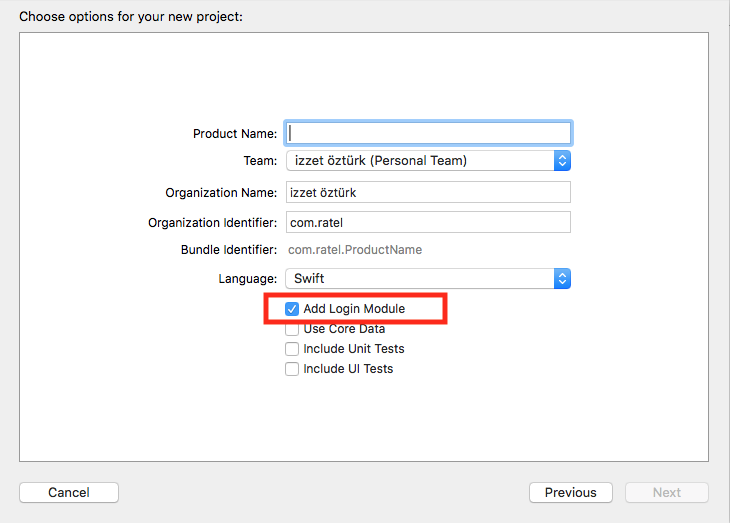
Ultimately, on the screen of project creation, there will be shown a checkbox as like below. This checkbox will be seen only if selecting the template which we have formed.
The statements and views expressed herein are the basics for creating Xcode project template. If you examine the other TemplateInfo.plist files, you can discover more detailed usages. This plist file provides not only copying and carrying processes, but also privilege of encoding preferred code block on preferred area; for example AppDelegate.swift file.
Have great discoveries! 🙂
Related Posts

Comments (0)